imagemap

Showing posts with label art. Show all posts

Thursday, August 18, 2016

Learning Centers Blog Hop Series: Art Center


Welcome back to the Pre-K Partner's Learning Centers Blog Hop Series! Every other Thursday (through November) we are highlighting unique learning center ideas. This week we are going to take a look at our art centers

My classroom consisted of individual art, group projects, and artist studies. Students created art in my classroom to express themselves and their creativity, to display a unit of study we were learning about, to learn about a particular artist/medium/technique, and to teach others about beauty in recyclables/nature/everyday items. 

I am certified as an early childhood teacher AND as an art teacher! I have always LOVED integrating art into my pre-k teaching curriculum. I am actually not teaching this year (so I can actually focus on my art career.) I've been given a new career opportunity, but I will greatly miss the fun art projects we have done in the classroom! I am continuing my Pre-K Tweets blog and I look forward to sharing with you my ideas, diy's, photos, products and experience from my very own teaching career. 


It took me quite a few years to build up the courage to have a "free art center" in the classroom! A free art center means to me is that all materials in the center are available and encouraged for students to use freely. Before, I did the traditional four kids at the teacher or teacher assistant table making a craft of some sort with googly eyes no less. Over the years, I learned more and more about process art and tried to encourage students' creativity in that way. We did still do the occasional Mother's Day look-a-like crafts and maybe an animal paper plate craft or two. But I think students' "got the most" out of or "best learning experiences" out of our free art center play, group projects, process & expressive art, and artist studies. 


Our art center consisted of cube shelving from Target and a table & chairs. In my last classroom, the art center was placed in the middle, centrally located, and close to the sink. Students were welcome to visit the art area during morning arrival (we also had breakfast and table toys going on) and during center time.  


We also had an art easel that could be used for watercolor painting and as a dry erase board. In this photo it is on display for Meet the Teacher night. Usually, the easel is closer to the art area and to the sink. I really liked this easel because it was on wheels and had a drying rack underneath!


As with all my centers, I themed them according to what the season was or what topic we were studying. Here, in the photo above, the art center was set for Valentine's week.

For art material storage I used mason jars for students to practice sorting marker colors. (A friend of mine used colored scrapbook paper to wrap around metal vegetable cans for her color sorting of markers/colored pencils.) I also used plastic Dollar Tree bins and baskets from Save-on-Crafts. 

During the first few weeks of school the art center is pretty bare looking as with all the other centers. During the first week it only has blank paper, coloring books, and crayons. I never introduce a new center or center item (like markers or scissors) before explaining, modeling, and practicing expectations with students. 


Creating art, expressing through art, and art appreciation is SO important in early childhood! Creating art stimulates small and large motor development through painting, drawing, pinching a crayon, dropping sequins, etc. Art helps children to gain self esteem, become proud of what they created themselves, and art also promotes decision making skills. Art allows students to experiment, make predictions, and learn from observations! Art provides an outlet for children who might not express themselves verbally.  Social skills are also practiced, such as sharing & taking turns, in the art center.  


I integrated art appreciation and introduced to new mediums/art techniques through "artist studies."  For pre-k, I showed a power point about an artist that told short interesting facts about the artist, showcased his/her art works, and asked higher level thinking questions of the students about the artists' works.  Questions like....how does this painting make you feel? What can you think of that looks similar to this sculpture? How do you think the artist created this piece?  I also asked questions like...how many shapes do you see in this painting? How do you think the artist made this color? Which one of these sculptures is your favorite? I would also place posters, framed art, and children's fiction/non-fiction books about the artist in the art center.

We then would begin a group project or individual art pieces. Sometimes the art would look similar and sometimes we were more selective in our choices. Also, sometimes the project would be short and sometimes (particularity a group process art project) would take weeks). It really depended on the students' interest as with any of our art projects. Some of the artists we studied were Monet, Chihuly, Mondrian, and Kandinsky.


The art center should grow into an area that encourages creativity/choice making by providing a wide range of materials! 


Here is a list of art center materials that remain in the art center permanently:

- markers and crayons
- pencils and colored pencils
- plain white paper
- glue sticks
- stencils and tracers
- a cutting tub with scrap paper/scissors
- vocabulary (for labeling drawings if students want to)
- books about art and artists (for motivation and inspiration)

Here are a few of my favorite art books! 


Here is a list of items that I rotate in/out of the art center:

- punches (like hearts, circles, stars..great for fine motor!)
- newspapers (for painting..easy to get from parents)
- coloring books (great for fine motor practice, also good 
morning arrival activity)


I also like to bring out something fun (especially on a rainy day) like a paint spinner, crayon melter, or introduce a new technique (like painting with yarn blocks)! 


The teacher's role is to act as a guide during art engagement. Students might need direction and motivation to make choices and decisions. Teachers can also build self esteem by saying things like "tell me about your painting..how did you think of that?" instead of "It's beautiful! Good job!" Students will be proud to tell about their art works and what parts they like about it! 

During art engagement is an optimal time for teachers to document student learning with photos or quotes! New discoveries are made everyday in the classroom through art. Documentation is a way for students to look back and see what they have learned. Documentation is also great to keep in students portfolios and show at parent/teacher conferences. 


Displaying student's art they have made in the art center is also important. The simple act of displaying a students work let's them know they are important and part of the class family. I hung my students work in the hall (command hooks/string/clothespins), on the classroom walls (command hooks, twine, clothespins) and from the ceiling off of branches and a wagon wheel.


I love art and the art center is one of my absolute favorites! I encourage you to encourage your students creativity by arranging an art center in your classroom! 

Now, hop on over to 
Fun in ECSE and learn about the art learning center importance and environment!


Friday, January 22, 2016

Valentine's Day

Happy Valentine's Day! ...well, almost! I ran across a few of my Valentine photos from past years as I was prepping for this year's event and thought I'd share a few... I'm so glad I rummaged through those Walmart clearance carts the day after Valentine's Day last year! I scored paper supplies and cute banner for this year. Each year we host a Valentine's breakfast and it's such a fun event! 

Students create the table centerpieces and we attach dollar store balloons to them! 
We usually start out eating our breakfast first which consists of Krispy Kreme heart donuts, tator tots, mini eggo waffles, sausage patties, and juice boxes. The hot foods are kept in a warmer on the counter. Students also enjoy fruit kabobs or fruit cups. I love having a breakfast party for Valentine's day...it's usually a much milder event and a nice change from a pizza party! 
After we eat breakfast, we play a game of Valentine Bingo. We play till everyone wins, it is pre-k after all! : ) Prizes include valentine pencils, stickers, or small trinkets. The last activity we do is usually a game or play-doh.  Last year we played a game where students raced to fill paper cups with candy hearts using chop sticks. Our homeroom mom came up with this idea and the kids loved it! This was also great fine motor practice! This year we plan to have red play-doh and heart cookie cutters/rolling pins. Our homeroom mom is making the play-doh and having parents donate the cutters. During our winter party, students ate then played games at stations. During Valentine's festivities I like to do things a little differently.  Play-doh is definitely a class favorite!


These Valentine bags were purchased at Hobby Lobby and bought during one of their discount days. Students bring their Valentine's in and place them in their own cubby. During our rest time, my aide and I fill the bags and staple them shut. With pre-k it's pretty difficult to make sure every person gets a valentine from..well..every person! I've found over the years that this way works best for my classroom..no mess..no fuss. I also pre label the bags and place them on top of their cubbies,..I can simply go down the line and fill the bags up! 
Here's another Valentine bag idea. Students watercolored paper heart doilies then glued them on their red Valentine bag. It was super cute and all the hearts looked different...

Each year the students get to make the Valentine's Day party centerpieces. I absolutely love my crayon melter! I cannot tell you where it's from. It was passed down to me and is so useful on many projects. Melted crayons are just such a different look and the kids love experimenting while swirling the colors. We use cotton q-tips to apply the melted crayons to cardstock hearts. After they dry, which takes just a few seconds, we attach the hearts to small wooden dowel rods. A couple hearts are placed in a mason jar with some filler and voila...cute centerpiece! For filler in the mason jar we've used crumpled colorful paper, tissue paper, crayons, and/or plastic beads. 


We also attach a balloon to the jar. Here's a tip: Have your students peel the crayons for the crayon melter themselves! It's a great arrival activity and helps fine motor skills! 
Here's another great fine motor activity! Yarn wrapped hearts...I bought the wire twine at Hobby Lobby. I cut all the wire about 10-12 inch lengths then bent into heart shapes and twisted them closed at the bottom. Students chose their yarn colors and wrapped and weaved to their "heart's" desire!  We hung them from the window with string..it's such a sweet keepsake and also could be used as a Christmas ornament. 
Valentines Day Broken Hearts: This is a game that could be played during your whole group math lesson or even during your party. I simply cut out construction paper hearts, wrote numeral on one side and drew matching chocolate kisses on the other. I cut the zig zags a little different on each. I scattered the broken hearts all around the room and students worked together to match them up! 

Students pucker up to the frog prince during Valentine's week! Students sit in a whole group circle and pass the frog as music is played. When the music stops..they have to pucker up! : ) : ) : ) It's a silly game and yet such a great time filler! It also is a great game for an opening activity at your Valentine's event!
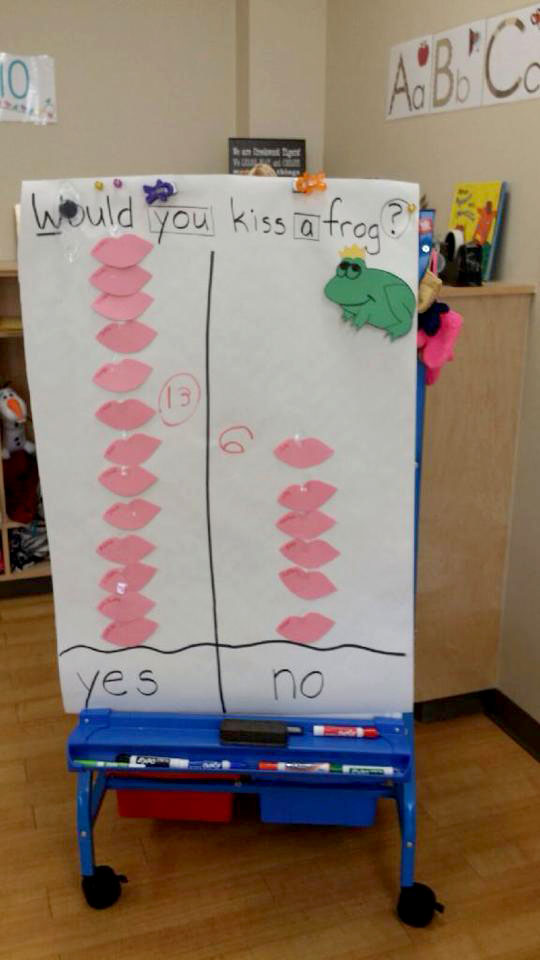
Our fairy tale unit flows nicely with Valentine's week!  My students love to graph! We graph our favorite fairy tales, characters, and different versions of stories that we like best. We read a few different versions of Princess and the Frog...one of our projects was this Pucker Up! graph... There were many giggles during this math activity! The original idea for this graph came from: http://perciousperks.blogspot.com/2011/10/if-i-had-fairy-godmother.html

None of our class parties would be complete without our festive photo booth! Our pre-k assistant, Mrs. B, does a a fantastic job of decorating it to fit our themes! It's been a Seuss booth, 50's car, Christmas booth, and of course a frog kissing station! Parents LOVE receiving photos of their kiddos during the year in the photo booth...this also is a fun activity to do during your Valentine's event!  For photo props, we bought a few foam Valentine cut outs and glued them onto sticks. 


Monday, March 24, 2014

Wooden Sculptures and Observational Drawings!

We started this project during our construction study in the Spring.  We received a tub of all these wooden shapes at the beginning of the year with our teaching manipulatives and I really didn't know what these shapes were for. We kept baskets of them in our blocks area and some in discovery center during our construction study.  Pretty soon students were rolling them, stacking, and seeing how high they could build.  I found the idea for this project from PlayfullyLearning.blogspot.com ....And thus began our wooden sculptures project!

 Here is a bit of an outline of our project:

Day 1:  We set out baskets around the classroom floor filled with these wood shapes and invited students to continue exploring and experimenting.  They started making their own individual creations and then invited them to draw what they had made.  We had talked in earlier discussions about what a scientific drawing is..."drawing what you see."  (Later this led us into a discussion about perspective drawing...I love that I get to talk about art and introduce these new concepts with PRE-K!)  Through observing and asking questions to groups exploring their shapes, we were able to have conversations about size seriation, balance, and weight!  I saved their drawings and their wood shapes went back into baskets.

Day 2:  Students were given back their drawings and now the drawing was used as a "plan."  We talked A LOT about using a plan for ideas all throughout this year.  Students used their drawing/plan to re-find their pieces and follow steps to put their sculptures back together....the fun part!  Most students stuck to their original plans and a few replaced certain pieces with other pieces...and that was totally fine! ..it was THEIR design!  During this segment, students were asked questions about the sequence of their design. What must happen first?  Then, when students felt like their sculptures were finished they glued the pieces together with Elmer's glue.  (Playfully Learning suggested using a paintbrush and glue..which worked well.)  I also had bought flat (different sized shaped) wooded bases at Hobby Lobby for their projects.  Which was interesting to see which base they chose that would fit their sculpture.

Day 3: Students used watercolors to paint their sculptures.

Day 4: Students created another scientific drawing..this time adding in color!

Day 5:  Students (who volunteered, and all wanted to) shared to the class about their sculptures. Their end products were AMAZING.. all unique and different. They expressed to the class how they came up with their ideas, what inspired them, and what it represented to them.  Although the end products were great, the overall learning experiences were fantastic!  I love open ended projects, full of choices, that allow creativity! By asking students open ended questions when they are creating..you will be blown away by their thought processes!  
Here are some photos that show our steps to creating this art.  What's even more amazing is that students could retell parents the steps they followed for this project!  First I found my shapes...then I looked at them and drew them..then I had to use my paper/plan to find my shapes again and build it...etc.   This student informed us that this was a bowling sculpture and that it is getting knocked down. 
This student connected two bases to fit her design.  She said, "First you press the button, then the little man hops on all the trampolines to get to end!"  
I just love how the sculptures are all unique..not one the same! Students were interested, engaged, EXCITED to share, and PROUD of not only their project but their learning!! They really surprised me by how well they observed and drew what they saw!  

Monday, March 10, 2014

Happy Dr. Seuss Week!

Dr. Seuss week was so much fun for our students AND teachers! Here are a few more activities we were able to incorporate.
Read about "Dr. Seuss Week part 1" here
Students decorated silly Cat in the Hat hats to their heart's content while wearing their silly hats of course! 
For journaling, students thought of funny food combinations and had to draw/share their ideas!

Silly socks were designed with dot markers for "Silly Sock Day!"  Here is the template.
Centers were transformed into Seussville for the week!  Here is a "Cat in the Hat" math game. I free handed the had outline and then drew different stripes.  I made about ten and students had to match the number of stripes to the numbered clothespin.  (matching, colors, counting, number identification, and fine motor!)
I cannot find the original source of this game and I don't take credit for it. It is a math game where a student rolls the dice, locates the number card, and then counts out fish for the bowl.  I use it during Dr. Seuss week and during our ocean unit. I love to use wooden or plastic trays to hold the games in math and ABC centers. I buy them at Hobby Lobby.
Another math game!  This is a go fish magnet game. Students use two jumbo foam dice to roll a number, add numbers together,  and search for the matching fish!  The poles are made from paintbrush sticks, yarn, and a heavy duty magnet. Click HERE or below to download some silly fish so you can create your own Go Fish game! 


"Dress like your favorite Seuss character day!"  Best dress up day yet!  This is our lovely pre-k assistant sporting a table/fish bowl combo!  She's so awesome! She even has a framed photo of Cat in the Hat on her "table."  Her fish bowl is made from a salad bowl attached to a headband/ribbon. The kids LOVED it! 
..and here are her lovely Dr. Seuss nails to theme with our week! 

Look how creative this mom was!  The fins are made of craft foam and attached to a t-shirt with safety pins! 
I love, love, love this game! I had been looking for a rhyming game easy enough for pre-k to put in ABC center. This is a truffula tree picture rhyming game.  You can purchase it here for FREE!
..and last but not least...favorite Dr. Seuss book graph I downloaded off the SMARTBOARD exchange...love that site!