imagemap

Monday, March 24, 2014

Wooden Sculptures and Observational Drawings!

We started this project during our construction study in the Spring.  We received a tub of all these wooden shapes at the beginning of the year with our teaching manipulatives and I really didn't know what these shapes were for. We kept baskets of them in our blocks area and some in discovery center during our construction study.  Pretty soon students were rolling them, stacking, and seeing how high they could build.  I found the idea for this project from PlayfullyLearning.blogspot.com ....And thus began our wooden sculptures project!

 Here is a bit of an outline of our project:

Day 1:  We set out baskets around the classroom floor filled with these wood shapes and invited students to continue exploring and experimenting.  They started making their own individual creations and then invited them to draw what they had made.  We had talked in earlier discussions about what a scientific drawing is..."drawing what you see."  (Later this led us into a discussion about perspective drawing...I love that I get to talk about art and introduce these new concepts with PRE-K!)  Through observing and asking questions to groups exploring their shapes, we were able to have conversations about size seriation, balance, and weight!  I saved their drawings and their wood shapes went back into baskets.

Day 2:  Students were given back their drawings and now the drawing was used as a "plan."  We talked A LOT about using a plan for ideas all throughout this year.  Students used their drawing/plan to re-find their pieces and follow steps to put their sculptures back together....the fun part!  Most students stuck to their original plans and a few replaced certain pieces with other pieces...and that was totally fine! ..it was THEIR design!  During this segment, students were asked questions about the sequence of their design. What must happen first?  Then, when students felt like their sculptures were finished they glued the pieces together with Elmer's glue.  (Playfully Learning suggested using a paintbrush and glue..which worked well.)  I also had bought flat (different sized shaped) wooded bases at Hobby Lobby for their projects.  Which was interesting to see which base they chose that would fit their sculpture.

Day 3: Students used watercolors to paint their sculptures.

Day 4: Students created another scientific drawing..this time adding in color!

Day 5:  Students (who volunteered, and all wanted to) shared to the class about their sculptures. Their end products were AMAZING.. all unique and different. They expressed to the class how they came up with their ideas, what inspired them, and what it represented to them.  Although the end products were great, the overall learning experiences were fantastic!  I love open ended projects, full of choices, that allow creativity! By asking students open ended questions when they are creating..you will be blown away by their thought processes!  
Here are some photos that show our steps to creating this art.  What's even more amazing is that students could retell parents the steps they followed for this project!  First I found my shapes...then I looked at them and drew them..then I had to use my paper/plan to find my shapes again and build it...etc.   This student informed us that this was a bowling sculpture and that it is getting knocked down. 
This student connected two bases to fit her design.  She said, "First you press the button, then the little man hops on all the trampolines to get to end!"  
I just love how the sculptures are all unique..not one the same! Students were interested, engaged, EXCITED to share, and PROUD of not only their project but their learning!! They really surprised me by how well they observed and drew what they saw!  

Saturday, March 15, 2014

Pre-K Tweets Classroom Tour!


Welcome to my pre-k classroom tour!  Classroom spaces and and arrangements are so very important and especially in the early childhood years! Defined areas for learning centers allow for students to be gravitated to new provocations and it also helps them know where to return materials properly. I love to create inviting center areas that are already set up for play! It gives students kind of an invitation to play and a few ideas about how to get started.  The center learning areas I have are: blocks, pretend, discovery, reading, abc's, art, ipads, math, sensory, puzzles, & light table.  Sometimes I don't have the centers open all at one time. For example, at the very beginning of the school year blocks and pretend centers are open. Students learn to be responsible in that center and then a new center is open/added every couple of days. I also like to incorporate the topic we are studying into all the centers. Currently, we are learning all about the season of spring! There are so many seasonal concepts students are interested in. We are exploring insects, spiders, butterflies, and gardens! We are also learning new art techniques with our Andy Warhol bee prints and learning about garden artist, Claude Monet!


First stop, our morning board area! Here we have our word wall which has our alphabet circle letters (purchase here!), sorted student names, environmental print from our community, and post-it note student drawings of vegetables we have been learning about!  We also have our Smartboard, Wish You Well Board, and other carpet/circle time supplies. 
Here is our newly arranged blocks center!  This is a new classroom and I finally came up with a solution of where I wanted our blocks center to relocate. For a few years I have had it open to the group carpet area. It allowed for students to have a lot of room to build...but when it was time to clean up (and even if I gave the blocks group a head start) ..students were waiting to sit because of the blocks on the floor.  So during winter break I revised the room layout a little bit which allowed for a new reading area, separate blocks area, and larger discovery area. It is working quite well! 
I am trying to stay with a more natural theme this year.. I purchased the two burlap canvases (above shelf) at Hobby Lobby and they display photos from our buildings study and photos of our observation of a hobby farm construction.  The carpet is from IKEA and I like how they colors and design are a bit toned down? ..unlike a regular primary colored transportation rug.  I was also attracted to this rug because it features a castle (for fairy tale unit), an igloo (for winter unit), and neighborhood buildings. We were studying community, construction, and maps when the rug arrived so it tied in nicely!  The mirror is actually a pretend dress up clothes cabinet that I flipped over.  It makes the center appear larger and students can view their constructions from a variety of angles! The blocks always stay in the center but I rotate extras with the current topic of study throughout the year! The "extras" include road signs, cars, construction vehicles, flowers, stuffed animals, plastic toys, people...whatever fits the theme. The blocks center also includes baskets for storage and clipboards. We practice drawing out our "construction plans" on the clip boards and students also like to copy the vocabulary posted.
Our newly expanded discovery area!  I have a large wooden spool/table and 2 wicker Ikea chairs that I hope to add in soon. The discovery center is all about investigation & finding out!  Students explore weight differences, measuring, size ordering, textures, etc.  The discovery center permanently houses science tools like a microscope, tongs, tweezers, pan balance, scales, binoculars, and magnifying glass. The center also has baskets for storage, clip boards for observation drawing & writing vocab, pencils, sensory bottles, plants, and vocabulary. 
In our discovery are we also have informational picture books on insects and gardens, seed activities, a butterfly observation basket, During our spring unit of study the center holds: The Very Hungry Caterpillar butterfly life cycle cards, plants, mini pretend nature doll house, seeds & seed packets, real butterfly wings, and a basket of textures. 


Here is an example of another unit of study in our discovery area. This photo is from our summer ocean unit from last year.  Items can easily be switched out and easily rotated to fit any theme! 
This is a photo of our spring math center that contains insect books (that focus on counting & time), folder games, a Hungry Caterpillar roll, count, draw game, a Hungry Caterpillar graphing game, chick eggs number match up, sensory numbers, and a few other spring themed math games. I love using trays for center games with little cups on the trays. Trays help students be ready to play with easy setup and easy clean up!  Before we play in new centers for the new topic of study we ALWAYS have a class circle time meeting about center procedures. We go through how to play every game (teacher and students model) and how to clean it up! This is so very important and helps center time to run much more smoothly and students learn practical life skills.

Our new reading area!  It contains a Hungry Caterpillar felt board for story retelling and sequencing, Hungry Caterpillar sequencing cards, pillows from Hobby Lobby, rug from Ross, two wicker Ikea children's chairs, insect puppets, books about gardens and insects, and also spring themed QR codes that lead to stories on the ipad. 
Our sensory tub is filled with flowers, magnet numbers, green and pink pots for patterning, gardening gloves, gardening tools, and watering cans.  It also has mini vocab. cards that I laminated and then taped to the side. Sensory is such a fun center and quite popular too! There are hundreds of sensory ideas on Pinterest. I store sensory materials in large plastic bags in a tub.  I like to sprinkle in plastic magnet numbers and letters and also post vocab on the outside of the tub. Tweezers, tongs, chopsticks, and shovels can be added to help with fine motor! 
This is our ABC center which now features Hungry Caterpillar word cards, Eric Carle stories, rhyming cames, and alphabet matching games. I have my writing center and ABC games combined this year and we call the whole center ABC center. The writing supplies are located next to this shelf and contain whiteboards, a variety of writing utensils, paper, and wikki stix.  The ABC center games can include: letter matching games, letter bingo, alphabet beading, letter i spy sensory bottles, letter formations sticks, letter tracing, etc. 
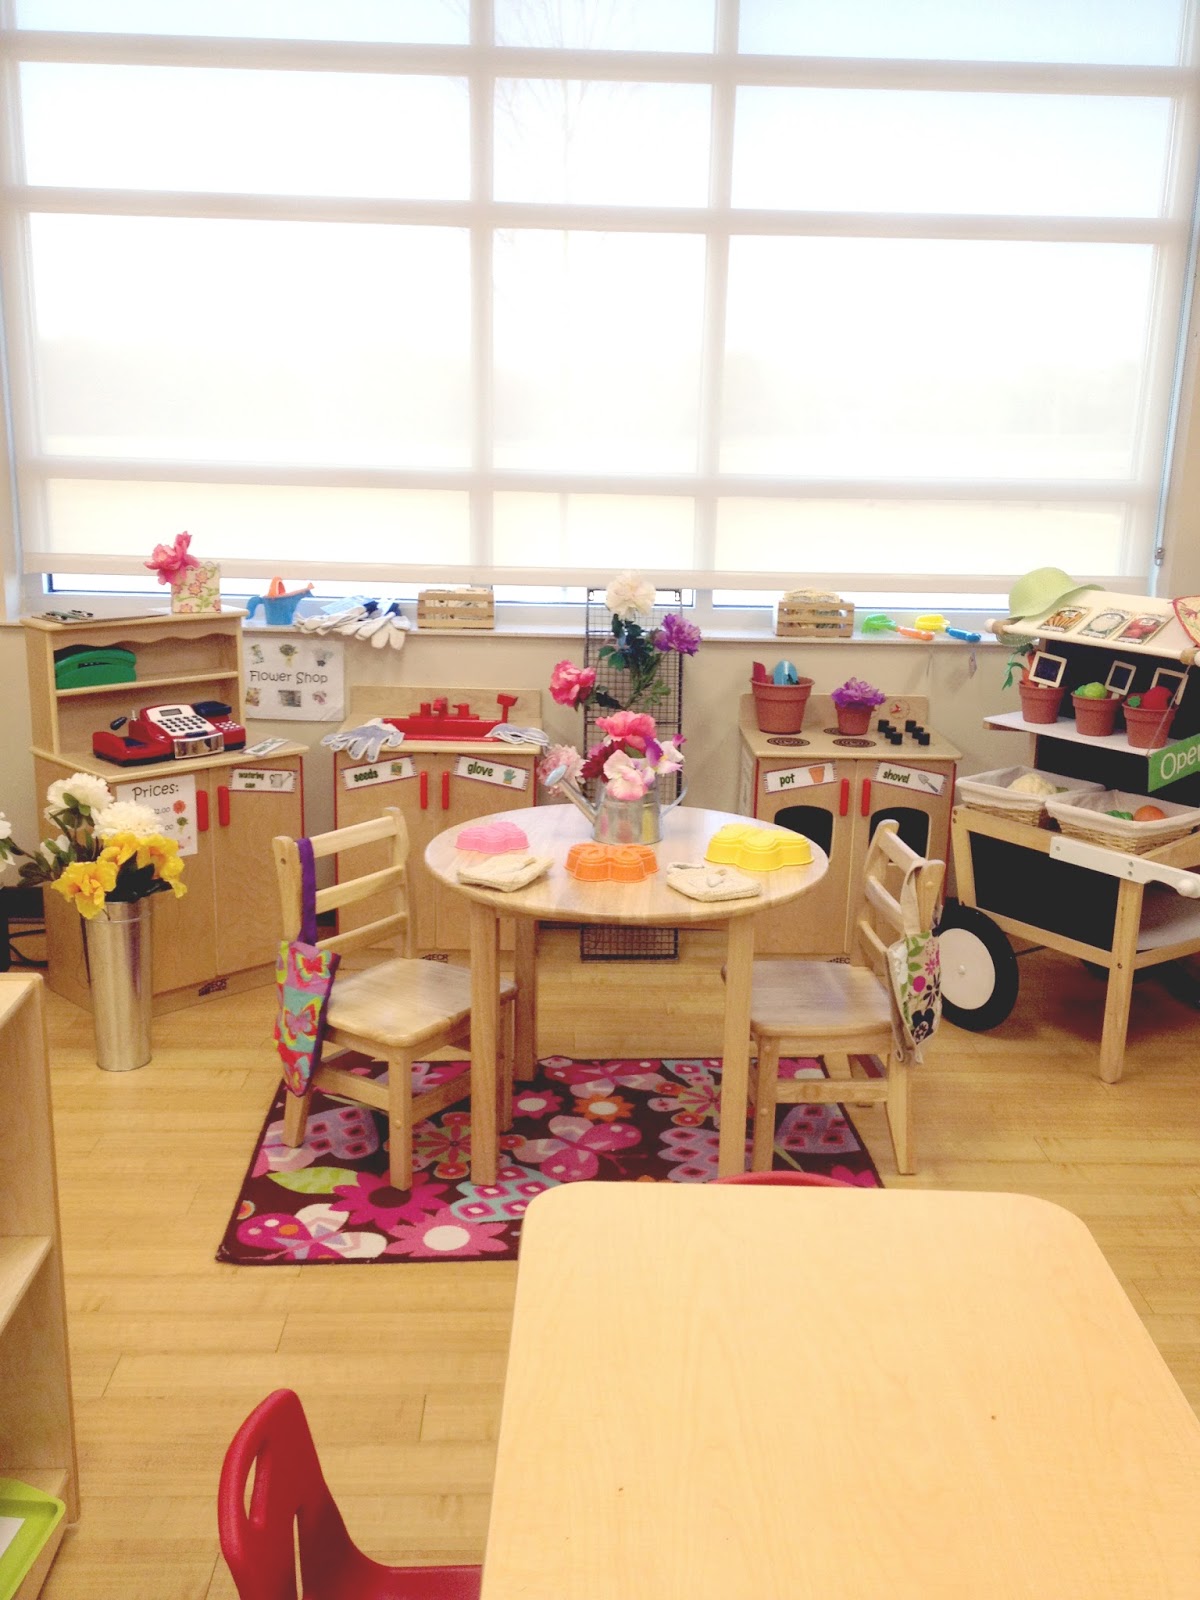
Our spring pretend center filled with farmer's market items such as flowers, pots, seed packets, and vegetables! 
We incorporated literacy into this center by having gardening books, seed packets, an open/closed sign, and vocabulary displayed. Pretend is such an important center to have for students to explore community roles, practice life skills, and just experience "play."  

This is just a glimpse of all the fun and exciting things going on in our classroom for spring!  Thanks for stopping by to check out our classroom! Only a few more months till school is out, then summer, and back to fall again! 

Monday, March 10, 2014

Happy Dr. Seuss Week!

Dr. Seuss week was so much fun for our students AND teachers! Here are a few more activities we were able to incorporate.
Read about "Dr. Seuss Week part 1" here
Students decorated silly Cat in the Hat hats to their heart's content while wearing their silly hats of course! 
For journaling, students thought of funny food combinations and had to draw/share their ideas!

Silly socks were designed with dot markers for "Silly Sock Day!"  Here is the template.
Centers were transformed into Seussville for the week!  Here is a "Cat in the Hat" math game. I free handed the had outline and then drew different stripes.  I made about ten and students had to match the number of stripes to the numbered clothespin.  (matching, colors, counting, number identification, and fine motor!)
I cannot find the original source of this game and I don't take credit for it. It is a math game where a student rolls the dice, locates the number card, and then counts out fish for the bowl.  I use it during Dr. Seuss week and during our ocean unit. I love to use wooden or plastic trays to hold the games in math and ABC centers. I buy them at Hobby Lobby.
Another math game!  This is a go fish magnet game. Students use two jumbo foam dice to roll a number, add numbers together,  and search for the matching fish!  The poles are made from paintbrush sticks, yarn, and a heavy duty magnet. Click HERE or below to download some silly fish so you can create your own Go Fish game! 


"Dress like your favorite Seuss character day!"  Best dress up day yet!  This is our lovely pre-k assistant sporting a table/fish bowl combo!  She's so awesome! She even has a framed photo of Cat in the Hat on her "table."  Her fish bowl is made from a salad bowl attached to a headband/ribbon. The kids LOVED it! 
..and here are her lovely Dr. Seuss nails to theme with our week! 

Look how creative this mom was!  The fins are made of craft foam and attached to a t-shirt with safety pins! 
I love, love, love this game! I had been looking for a rhyming game easy enough for pre-k to put in ABC center. This is a truffula tree picture rhyming game.  You can purchase it here for FREE!
..and last but not least...favorite Dr. Seuss book graph I downloaded off the SMARTBOARD exchange...love that site!